-
admin
- August 12, 2024
Create Your Custom IoT Testing Solution: Streamlining Workflows with Synthetic Data
As IoT technologies continue to advance, the need for thorough testing of these services is more critical than ever. Ensuring that IoT systems can handle long-term operation and high data volumes without failure is a significant challenge. This tutorial offers a practical solution: a system that generates synthetic data to mimic real-world conditions, enabling you to stress-test your server and evaluate how your IoT services, dashboards, or websites will perform over time. By the end of this guide, you’ll be equipped to implement and customize this solution to meet your specific testing needs.
Step 1: Setting Up the Environment
Before diving into coding, you’ll need to set up your environment. Make sure you have Python installed on your machine. You’ll also need to install a few Python packages, which we’ll use throughout the project.
Here are the key packages:
pandas: For handling CSV files.requests: For uploading files to a server.concurrent.futures: For multithreading.
You can install the necessary packages using pip:
![]()
Step 2: Creating the Configuration File
The first thing you need is a configuration file (config.ini) to store settings like site IDs, device IDs, and other parameters. This will allow you to easily adjust the script’s behavior without changing the code.
Here’s an example of what your config.ini file might look like:

This file defines which sites and devices the script will handle, the variability in the data, and the URL to which the data will be uploaded.
Step 3: Generating Synthetic Data
With the configuration file in place, the next step is to generate synthetic data. This is particularly useful for testing purposes. The data generation should mimic real-world metrics like voltage, current, power, and temperature.
Here’s how you can generate the data:
- Load Configuration: Start by loading the site IDs, device IDs, and standard deviation from the configuration file.
- Generate Data: For each device at each site, generate data points using Gaussian distribution. This ensures the data has natural variability, similar to what you’d see in real-world measurements.
Here’s a simplified version of the data generation process:

Step 4: Saving Data to CSV Files
Once the data is generated, it needs to be saved in a structured way. You’ll store each device’s data in a separate CSV file. The files should be named based on the site and device IDs for easy identification.
Steps to save data:
- Create Directory Structure: Ensure there’s a directory for each site. If not, create it.
- Save CSV Files: For each device, create a CSV file with the generated data.
Here’s a sample of how to save the data:

Step 5: Speeding Up Data Handling with Parallel Processing
When dealing with multiple devices, performance can become an issue. To handle multiple operations simultaneously, we’ll use Python’s ThreadPoolExecutor. This will allow us to generate and save data concurrently for several devices.
How to implement multithreading:
- Initialize ThreadPoolExecutor: Set the maximum number of workers based on your system’s capabilities.
- Submit Tasks to the Executor: For each device, submit the task of generating and saving data to the executor.
Here’s an example code to illustrate the concept:

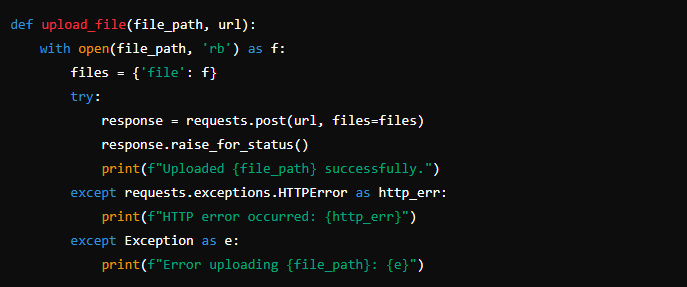
Step 6: Uploading Data to the Server using API
After generating and saving the data, the next step is to upload these files to a server. This is where the requests library comes into play. The script will iterate through the CSV files and upload each one using an HTTP POST request.
Steps to upload data:
- Read CSV Files: For each site, read the CSV files corresponding to the devices.
- Upload via POST Request: Use the
requests.post()method to upload the files to the specified URL in the configuration file. - Handle Errors: Implement error handling to catch any issues during the upload process.
Here’s how the upload process might look:

Step 7: Logging and Monitoring
To keep track of what the script is doing, logging is essential. You should log every significant event, from successful data generation and upload to errors that might occur. This will help you monitor the script’s performance and troubleshoot any issues.
Steps to implement logging:
- Set Up a Log File: Create a log file where all events will be recorded.
- Log Events: As the script generates data, saves files, and uploads them, log each event. Include timestamps and detailed messages for clarity.
Here’s a basic example of logging:

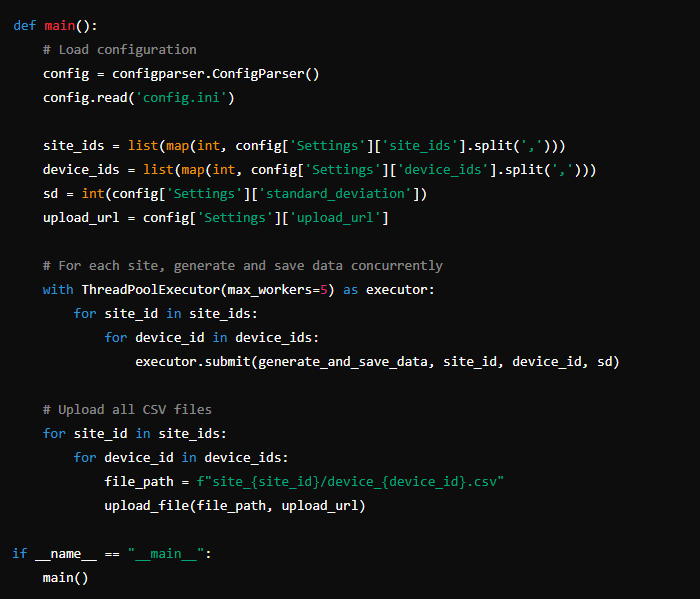
Step 8: Bringing It All Together
Now that we have all the individual components, it’s time to bring everything together in the main function. This function will coordinate the entire process—from loading the configuration, generating and saving data, to uploading it and logging the process.
Here’s how the main function might look:

Conclusion
By following these steps, you can build a powerful, scalable, and customizable data management system. This solution will allow you to generate realistic data, save it efficiently, and upload it to a server—all with minimal manual intervention. The use of multithreading ensures that the system can handle large volumes of data, while logging keeps you informed about its operation.
This system is adaptable to various use cases, whether you’re working in IoT, smart grid management, or any other field that requires efficient data handling. Feel free to modify and expand the script to meet your specific needs, and don’t hesitate to reach out if you have any questions or need further assistance.
Happy coding, and may your data always be well-managed!